Flat Color Photos

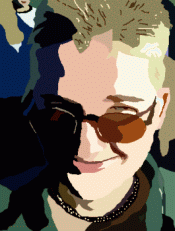
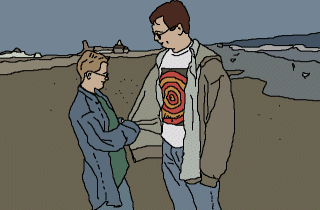
It's summertime! And what did you used to do during summer? Go to camp! And what did you do at camp? Make arts and crafts! So this is a digital arts and crafts project for you to try. An example of what you'll be making is here on the right: that's me and Mo on the beach in Ocean Grove, New Jersey, and I think it's a great and romantic shot. (You can see a few more examples of the method on kisrael.com) For lack of a more imaginative name, I call the images "flat color photos" though as you'll see, it wouldn't be unfair to call it "tracing plus paint by number" (or, as someone pointed out, "poor man's still frame rotoscoping".)

Here's what you'll need: I'm going to assume you know a little about your paint program: how to use the drawing tool, how to select colors and flood fill, how to resize an image, how to use that tool where one color gets replaced with another, and how to use layers

(Hmmm...if you knew all that I'm assuming you know, you probably don't this entire explanation! Ah well, I'll write on regardless... after all, I hadn't had much luck using layers before I taught myself how to do this.)

Thick brush
Thin brush
So, load or cut and paste the base photo into your paint program. Add a new layer in front of it...you might want to name this layer "drawing" to keep track of where you are. You need to make sure that you end up drawing on that layer, and not the photo, or else the Flood Fill won't work (among other problems, like losing your guide image.)

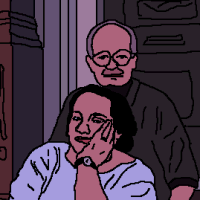
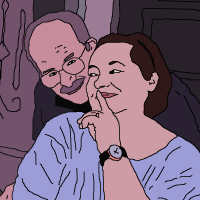
Now, select your drawing pen/brush. Select a really obnoxious, easy to see color like neon green, something that doesn't show up in the original photo, so that you can see what you're doing. Now, what size brush should you use? It depends on A. how big is your original image, and how much do you plan to shrink it down and B. what kind of effect are you going for. You might have a hard time getting the details right with a big brush. Brush size is relative: for my first works, I used a 2 pixel brush on a 500x400 or so canvas, and it was thick. Later, I'd use a 3 pixel brush on a 1600x1200 canvas, and it was rather thin. You can see those two effects here, with pictures of my Aunt and Uncle.

I personally always like working with "pure pixels" and then shrinking later to smooth things out, so I suggest you turn off antialiasing for your paintbrush. Regarding photo size, as with most computer art, it's easier to work big and then shrink it to the appropriate size after. (Making sure to keep a copy of the fullsize original in case you want to make changes at some future point.)

Once you have a fair size antialiasing pen in a bright enough color, start tracing! It's not always as simple as it sounds, sometimes you have to switch between hiding and showing the drawing layer to make sure you're getting things right, and often it might be hard to determine what the detail you're drawing over is. Some artistic skill is useful here. You want to focus on the strong, obvious edges, generally ignoring changes in brightness or tone. Once you're mostly done, try hiding the original photo, and make sure what's left makes sense as a picture. (Also, try to find any 'gaps' between spaces of different color, where one Flood Fill will fill in both sections.) You might want to leave out certain background detail. For instance, in the images of my Aunt and Uncle, my Aunt was wearing some reading glasses around her neck that I left out, because the angles and lines wouldn't have made sense. On the other hand, the detail of the stoop they were on was cool and fun to draw.

I can't decide whether it's better to freehand straight lines in the background (like on a building) or whether it's better to use the Line tool. You can see things get a little wobbly on the second image of the stoop. Also, depending on the shot, it's ok to bend a line here and there to complement the subject of the image. (There is no person so lovely to behold that you can't take a somewhat unflattering shot of him or her, and sometimes those shots are interesting photos to give the "flat color treatment"... so use your best judgment.)

When the drawing is done, it's almost time to start painting. But first you should use the Color Replace tool to change from angry green (or whatever) to more typical black. After that, use the eyedropper/color select tool to pick a photo color from each region, and then floodfill the entire area with that single color. I've found it best to pick the brightest color from any given area...you'd be surprised at how odd fleshtones can look in different lower levels of light. Again, some judgment may be required here and there, and it is ok to cheat. (For some indoor shots, for example, I grabbed the fleshtone from an outdoor shot.) When you're mostly finished, try toggling the visibility of the photo layer...the flashing will let you see what areas you may have missed with the Fill tool.

A slightly different technique
That's pretty much it! Save a copy of the fullsize version, and then resize for whatever use you want. These things look pretty good printed out (in which case you might stick with full size) or online (web or e-mail, in which case you'll probably want to shrink it down some.)

I'm including a slightly different technique I used on a picture of Mo. Here, instead of tracing the color borders, you trace the areas next to the border, in the color of the area. Also, you'll probably want to use more colors, and pay more attention to the shades in general. This method takes longer than the "regular" cartoony version, but some people like the results better. (and some don't.)

Hope you get a chance to try this technique! Let us know on the Blender Board if you make anything cool!
blender homesubmit workread latestadd messageread board